Building new Emulation Application – EmuHub
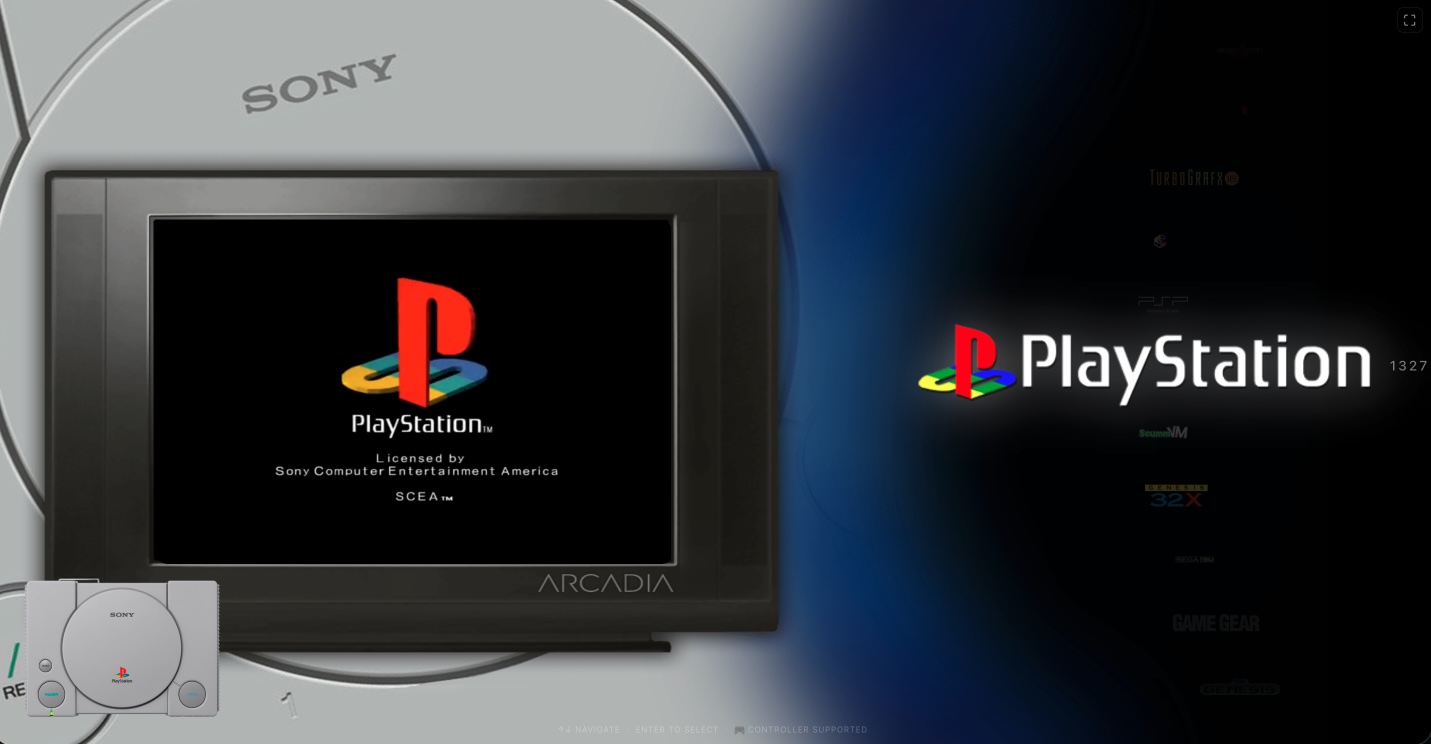
EmuHub – Frontend

It’s been a while since my last update, but for good reason—I’ve been busy working on something I’m genuinely excited to share.

If you’ve spent any time in the emulation scene, you’ve probably come across EmulatorJS—and more specifically, the excellent build from Linuxserver.io. Their version offered a clean, user-friendly frontend that made managing and playing retro games incredibly accessible. Unfortunately, that particular build has since been discontinued. The good news, though, is that the core EmulatorJS project is still very much alive and continuing to improve.

That got me thinking.

I really liked the frontend style that Linuxserver.io created, but I also wanted to take advantage of the newer cores and ongoing advancements from the EmulatorJS team. On top of that, I saw an opportunity to expand things even further—bringing in additional cores directly from Libretro, including some older or less commonly compiled ones like BlueMSX.

So… long story short—I decided to build my own.

Right now, the working title is EmuHub, though that may evolve over time. The goal behind EmuHub is to create a powerful, flexible emulation platform that blends a polished, “HyperSpin-style” frontend experience with a robust and intuitive backend management system.

At its core, EmuHub is designed to be simple to deploy and easy to manage. It runs via Docker and provides two main interfaces: a management backend (default port 3000) and a user-facing frontend (default port 80). From there, everything is built to streamline the setup and customization process as much as possible.

Key Features

Automated Configuration Interface
EmuHub includes a streamlined configuration system that automatically generates all necessary files and game lists for the frontend. A built-in ROM scanner ensures your library is properly structured and verifies that everything is in place before building out the configuration.

Expanded Core Support
In addition to downloading all officially supported EmulatorJS cores, EmuHub allows you to easily add extra cores—including those available through Libretro and others that aren’t typically bundled.

Integrated Media Scraper
A built-in scraper pulls in artwork such as box art, screenshots, videos, and wheel logos for both games and systems. Currently, this feature integrates with ScreenScraper to provide rich media content automatically.

Library Management Tools
Manage your collection with ease—upload custom artwork, manually scrape metadata, or hide titles you don’t want displayed in your frontend.

BIOS Manager
Handling BIOS files can be a pain, so EmuHub simplifies it. With MD5 verification, upload tools, and automatic placement, it ensures everything is correctly named, validated, and stored where it belongs.

Theme Customization
A full theme manager lets you modify system themes or create your own. You can use default assets, scraped media, or custom uploads—and even fine-tune layouts with a built-in editor to position videos and artwork exactly how you want.

Advanced Configuration Editor
For those who like control, the config editor allows direct customization of system settings, including selecting preferred cores when multiple options are available.

System Settings & Tools
Additional utilities include configuration import/export, a Docker Compose generator to simplify deployment, and various system-level settings to tailor the experience to your needs.


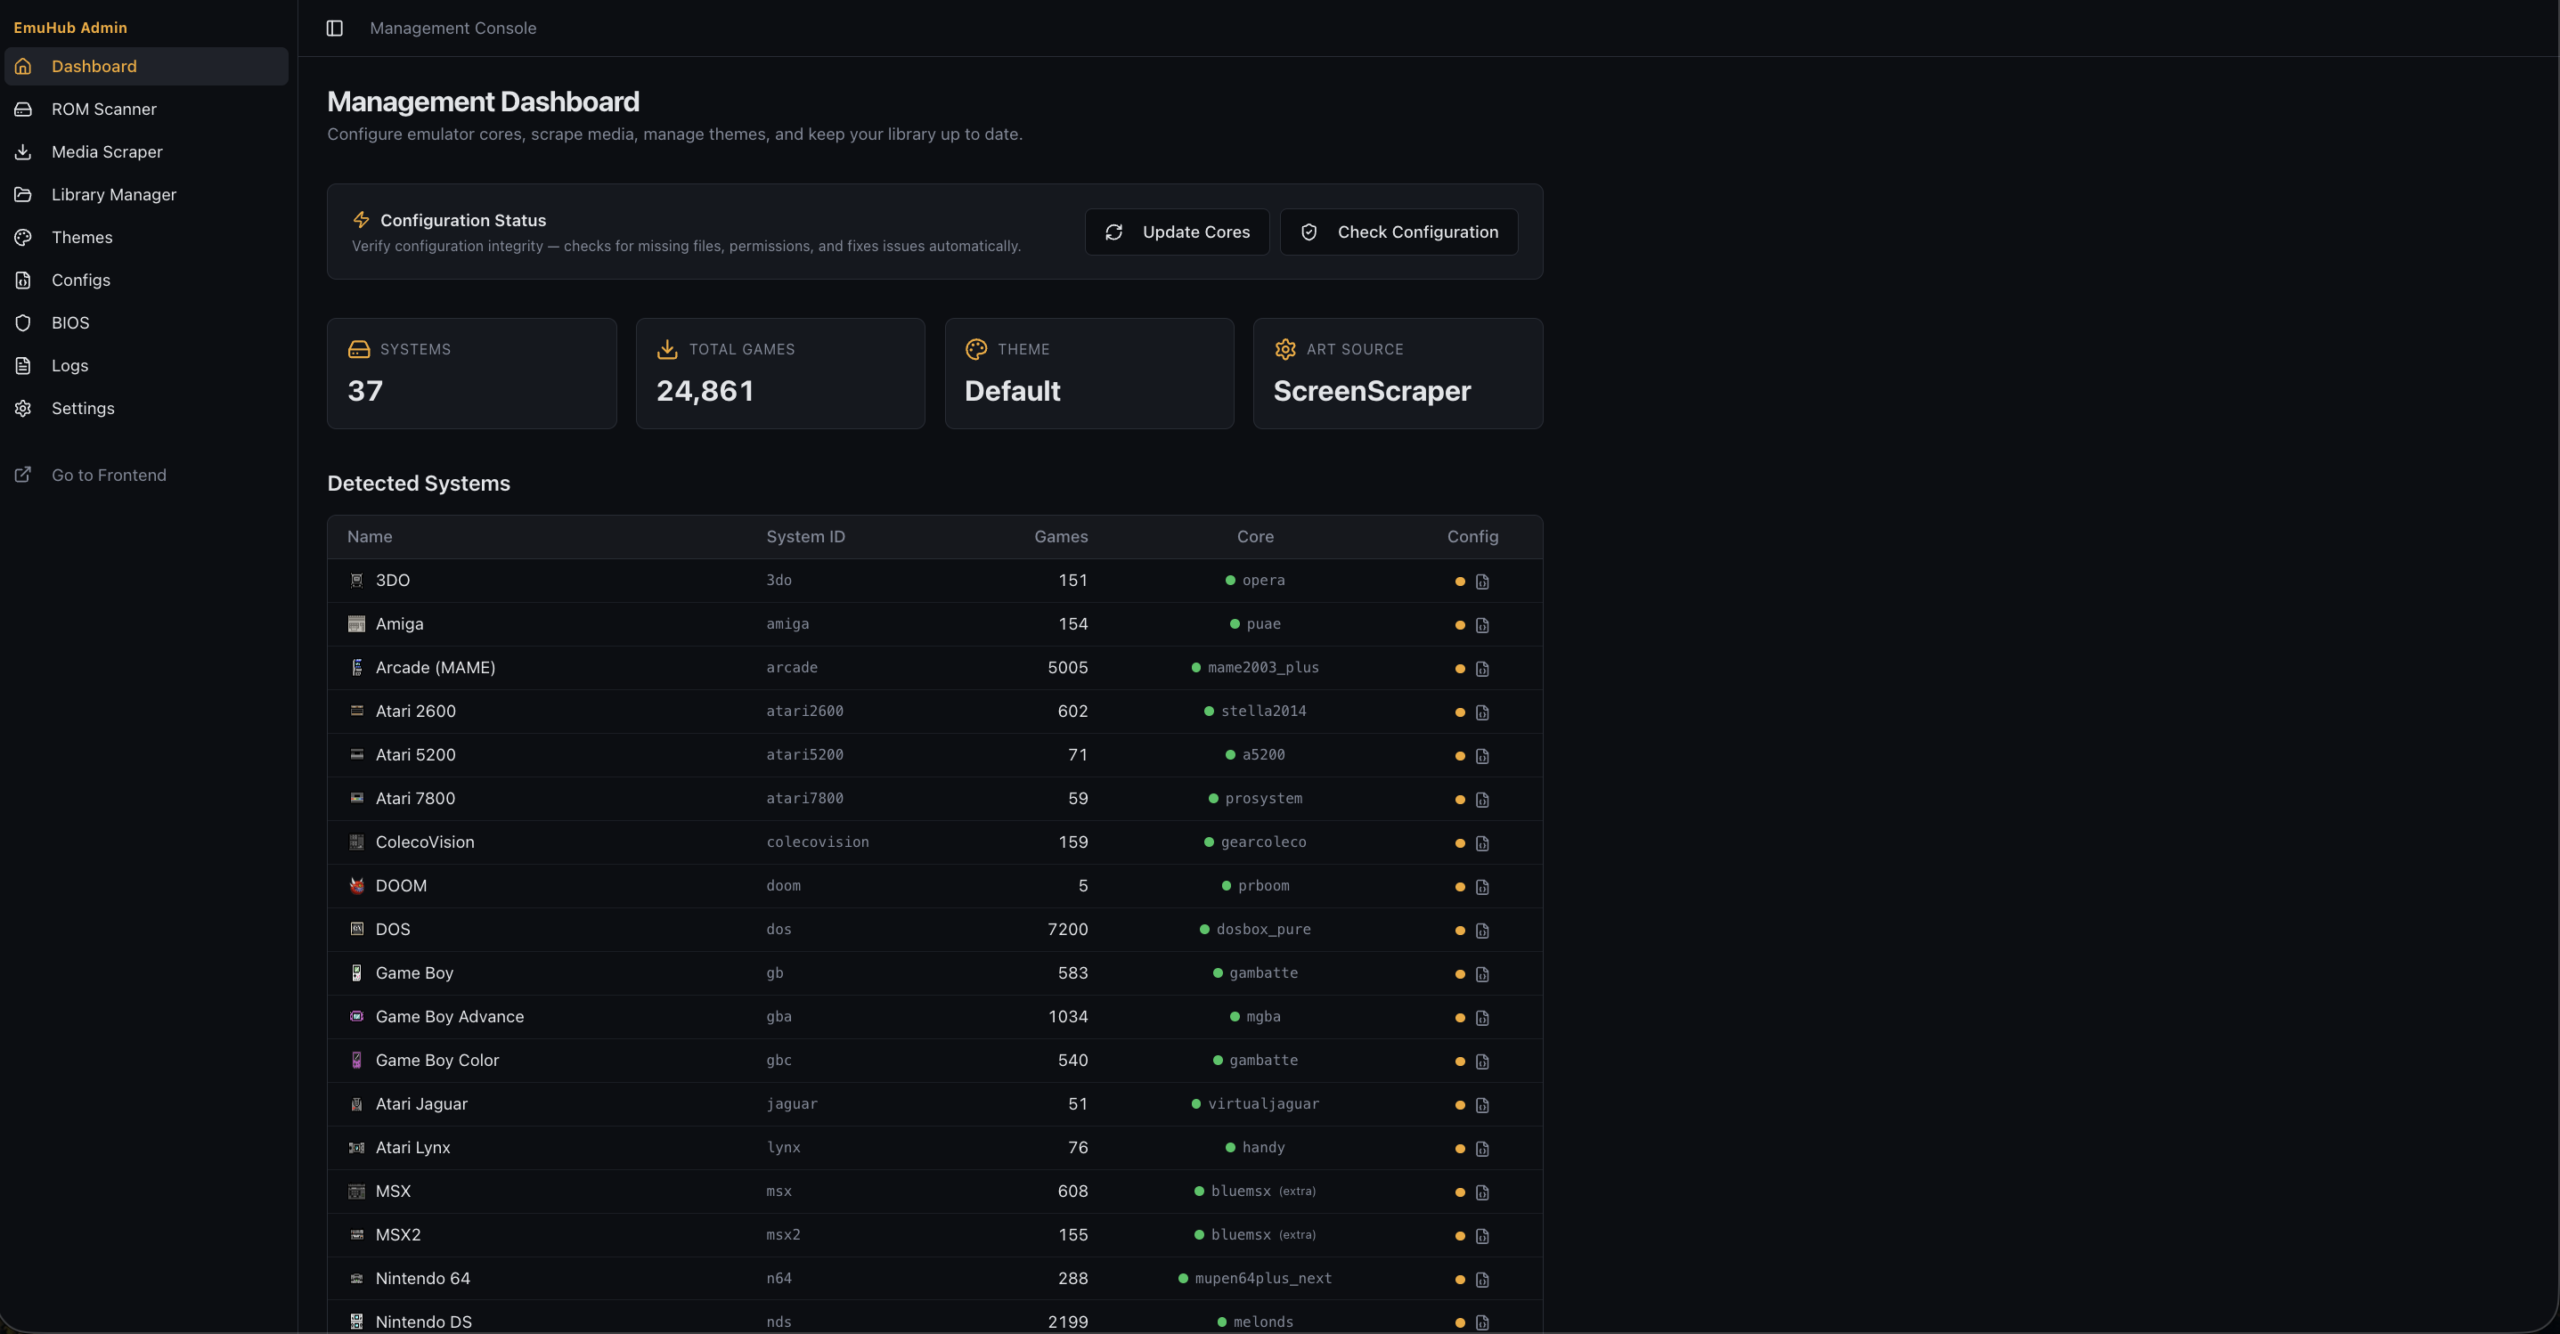
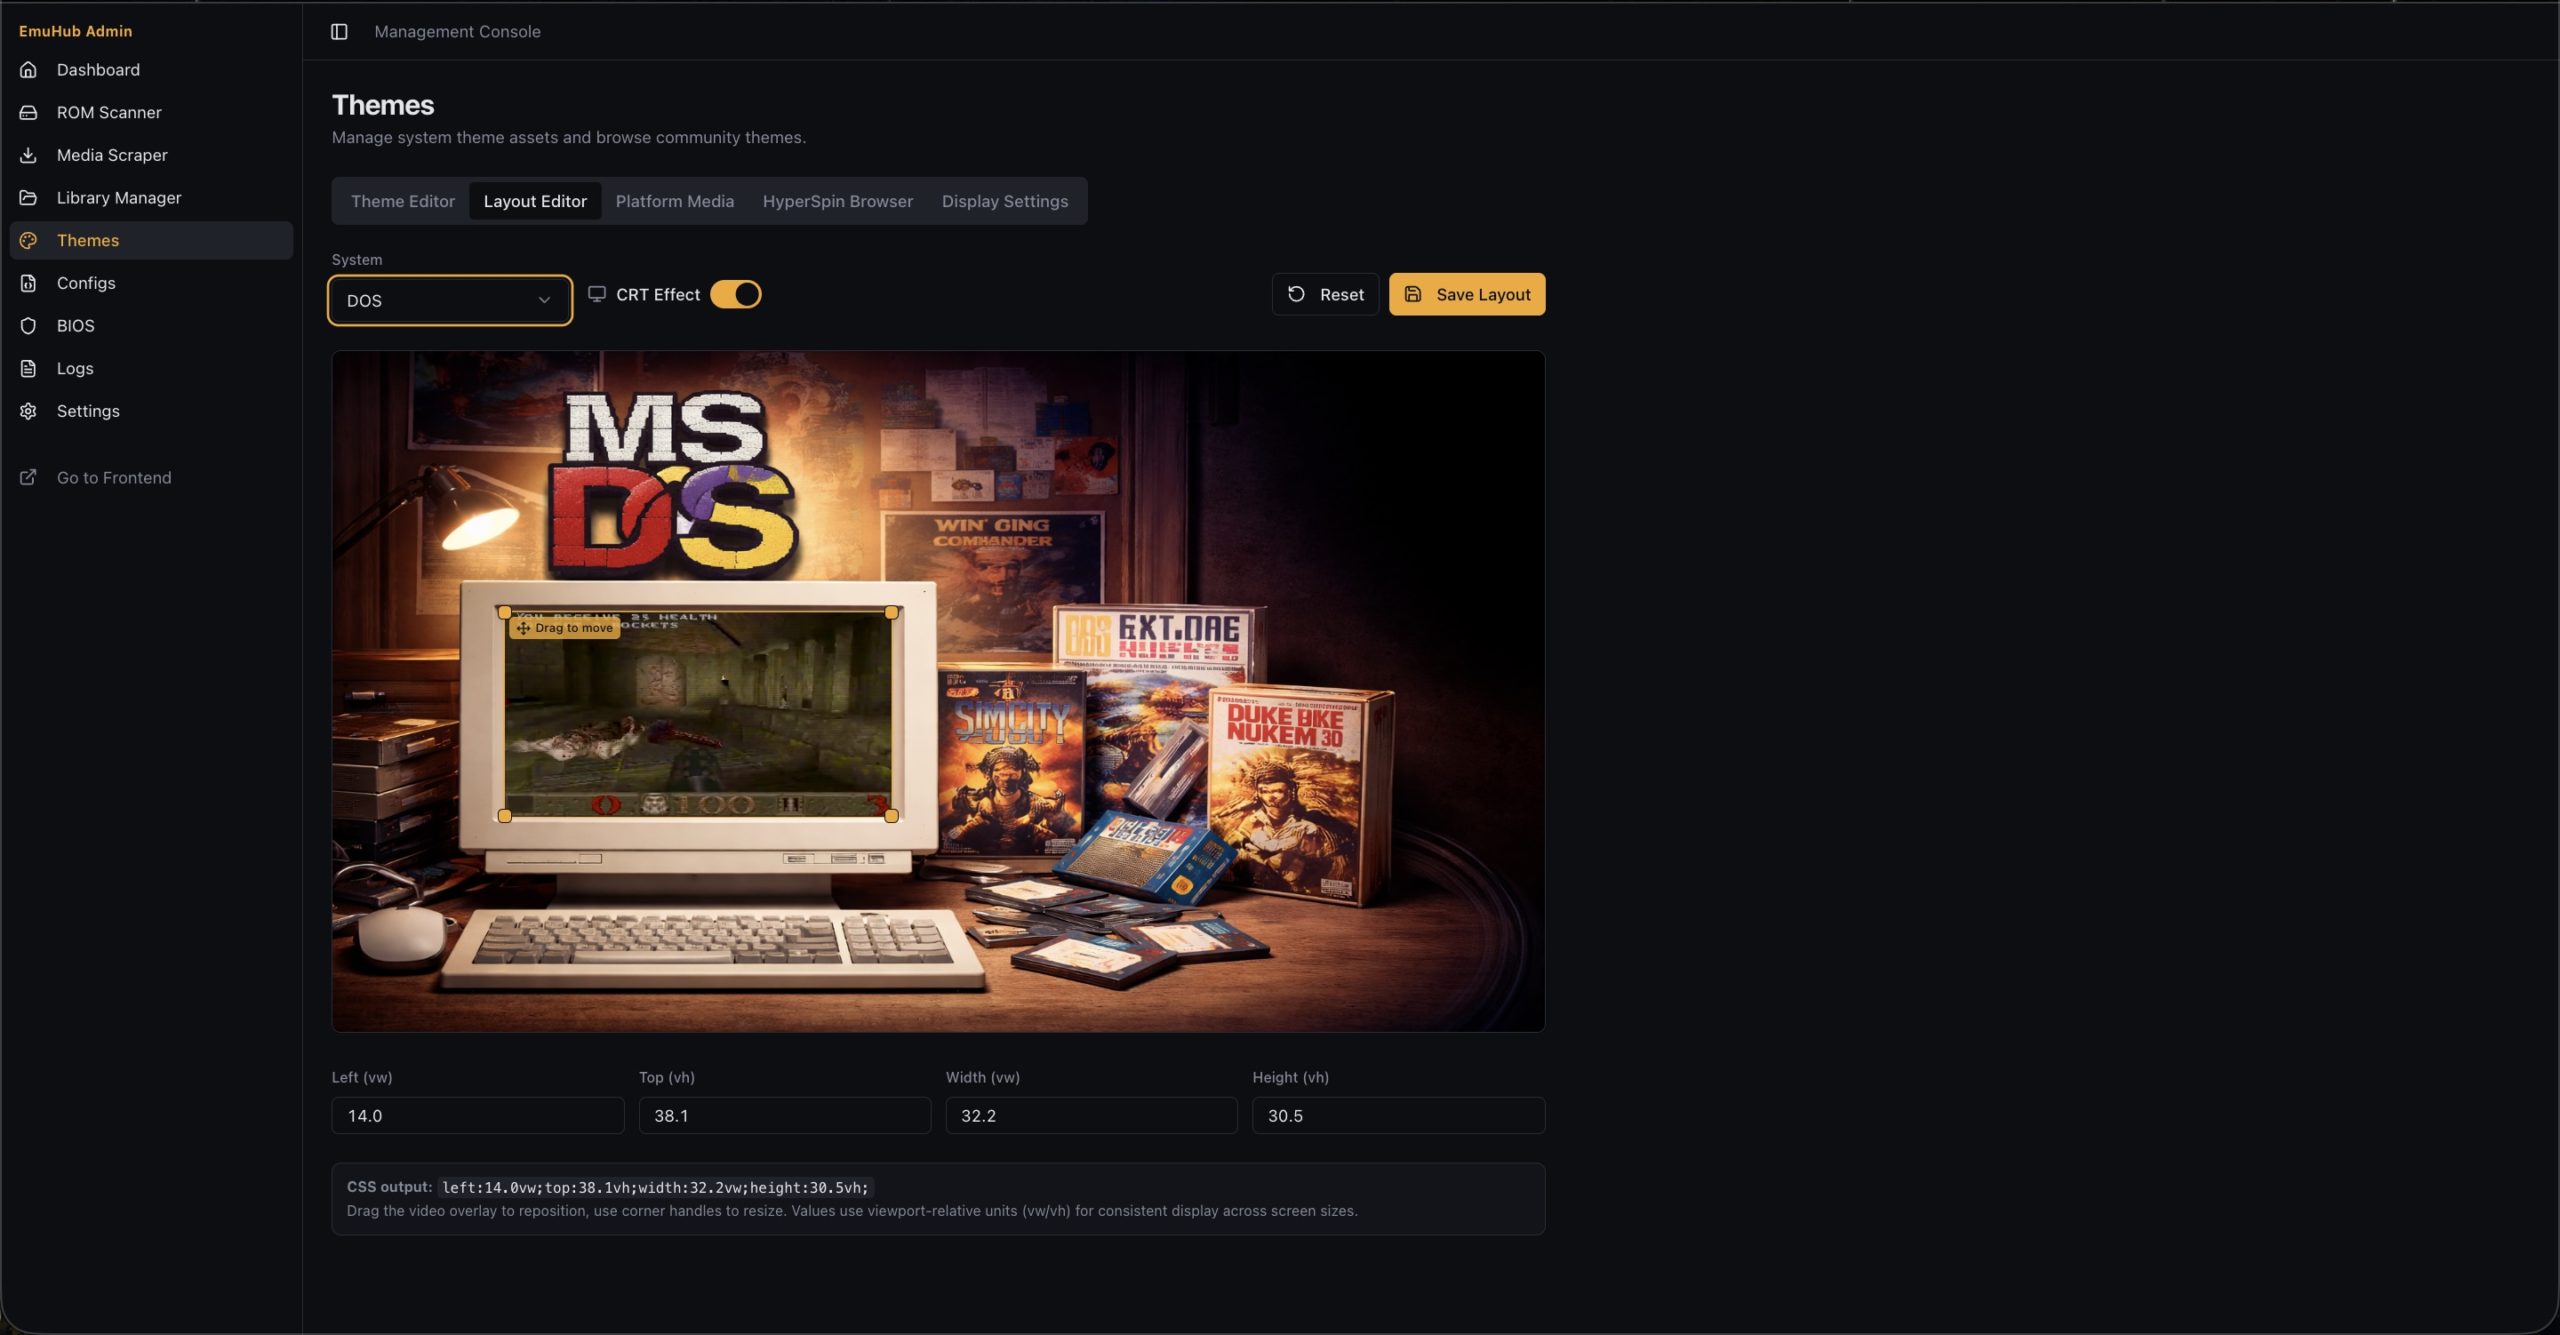
Main Dashboard & Layout Editor

This is still a work in progress, but it’s shaping up to be something really special. I’m building it first and foremost for myself—but I’m hoping others in the emulation and retro gaming community will find it just as useful.

Also, to note – the themes are likely going to change…and if I have it my way…I will have a theme browser/downloader as well (if you notice the “HyperSpin Browser” there 😏)

The Github Repo is not yet public facing, but it should be released in the near future.

More updates to come soon!

Boxer Updates

https://boxer.thec0de.com is getting some attention!

I’m glad to see people are still into retro games and love Boxer specifically as it’s a fantastic implementation of the DosBox core. It is true to the Mac “Easy to use” style, looks super cool (especially the MT-32 emulation with display!), and works great. I do hope to see continued work on this from MaddTheSane and others so we can continue to preserve the project far in to the future for many generations to enjoy.

I also wanted to give a shout-out and thanks to the folks at 56tvmao.com for referencing us in one of their articles!

https://www.56tvmao.com/index.php/2025/01/09/playing-old-dos-games-on-macos-with-dosbox/

Looking forward to more cool projects in the future for Dos and other retro things.

Happy New Year! Let’s make it a great 2025 🍻

WoW Server Down

Just wanted to let everyone (a few) know that the WoW server is down for the time being. ACore likes to destroy itself with every few updates, and it’s tiresome to repair corrupt databases. They don’t fix it, or reply to github posts. I will keep it down for now as it is a resource hog without much traffic. It may return in the future.

Simple Backup using Rsync with Synology NAS

I was doing some research for a backup solution for my Fedora 39 Linux Server. I was expecting to use the “Active Backup for Business” software that Synology has. It’s quite easy to setup an agent on Windows and Mac…but not as easy for Linux. Sure, if you are one of those people that have an old version of Linux – it’s not going to be really painful for you (Good luck with updates & security eventually though!). However, if you are on Fedora’s latest versions…it’s not supported!

GREAT! I was hoping maybe I can jimmy it on there, but a brief Google search found many people complaining about the same thing and no hope in site for Synology to update their software. It just doesn’t support the 6.x kernel, so I wasn’t going to spend time trying to force it. Not a backup solution of all things. SO, here began my research in to many options available for Linux backup options.

There are many options out there, but I settled on rsync because of my basic needs. I’ve read arguments regarding duplicity, compression, encryption, and data stability for multiple solutions. Rsync can do a LOT of things that I didn’t realize at first…after all it’s just a “remote sync” tool right? Throw in a Synology in to the mix, and people have had mixed results with backups going to these devices depending on how their setups were configured.

Some options made full images of the system, but those took a lot of space (which I don’t have tons of to waste of massive backups), and time (like Clonezilla and similar ‘full backup’ options). I looked a Veeam, Borg, Restic, BackupPC, TimeShift, BackinTime, and even Bacula…just to name a few. However, many of these required a server/agent client setup and quite a bit of learning (some more than others)…didn’t support Fedora 39, or something else that didn’t quite sell me on it 100%. Now…these are great software solutions for people that need all these features…but all I need here is ONE linux server backed up.

It was difficult to find one that fit my specific (and what I thought) basic needs:

  • Synology Support (Easy, not hackery via SSH – Also reliability of course)
  • If not Synology Support, Easy management system via ISO distribution or linux installation (bare metal install or docker).
  • Web GUI required (though simple command line/config will do I suppose – This is a headless install, so GUI is not preferred).
  • Data backups
  • Easy!!! (I don’t want to spend a lot of time learning a massive solution – I have basic needs).

Long story short – I ended up going with rsync because Synology has a rsync server that I enabled, and easily setup a user. It has a NetBackup folder it automatically creates, so I made sure this user had access to this folder. The rest is done via a simple Bash Script I wrote that runs database backups and then syncs files within my desired folders to the Synology.

Make a file called backup.sh

#!/bin/bash
echo 'Starting Backup...'
echo ''
echo 'Creating Database Backups...'
echo ''
echo 'Dumping WoW DB..'
/root/wowdbbackup/wowbackup.sh
echo 'Dumping XWiki DB..'
/root/xwikidbbackup/xwikibackup.sh
echo 'Done Dumping Databases'
echo ''
echo 'Backing Up Files...'
echo ''
echo 'Backing up /root'
rsync -av --no-o --no-g --no-perms --checksum --password-file=/home/backup/rsync_password /root nasuser@192.168.1.100::NetBackup/My_Backup/
echo 'Backing up /home'
rsync -av --no-o --no-g --no-perms --checksum --password-file=/home/backup/rsync_password /home nasuser@192.168.1.100::NetBackup/My_Backup/
echo 'Backing up Docker Volumes'
rsync -av --no-o --no-g --no-perms --checksum --password-file=/home/backup/rsync_password /var/lib/docker/volumes nasuser@192.168.1.100::NetBackup/My_Backup/
echo 'Backing up Data Folder'
rsync -av --no-o --no-g --no-perms --checksum --password-file=/home/backup/rsync_password /Data nasuser@192.168.1.100::NetBackup/My_Backup/
echo 'Backing up BitWarden'
rsync -av --no-o --no-g --no-perms --checksum --password-file=/home/backup/rsync_password /opt/bitwarden nasuser@192.168.1.100::NetBackup/My_Backup/
echo 'Backing up WebSites'
rsync -av --no-o --no-g --no-perms --checksum --password-file=/home/backup/rsync_password /var/www nasuser@192.168.1.100::NetBackup/My_Backup/
echo 'Backing up Nginx Site Configs'
rsync -av --no-o --no-g --no-perms --checksum --password-file=/home/backup/rsync_password /etc/nginx/sites-available nasuser@192.168.1.100::NetBackup/My_Backup/
echo ''
echo 'Done!'

It creates database backups first via separate scripts. These place the files in /root which is backed up.

–password-file is where you simply create a text file that has the password in there (chmod 600 that file).

Use your user instead of nasuser and your Synology IP instead of 192.168.1.100.
Use your backup source and destination paths as well.

Don’t forget to give it execute permissions: chmod +x backup.sh

Now you can run it and test to make sure it’s creating the files. If it is looking good, make a crontab entry to run it as often as you’d like. Mine runs daily at 3AM for example:

(You can enter crontab by typing: crontab -e)

0 3 * * * /home/backup/backup.sh

Save it (if using vi, it’s :wq!)

You should be all set! Of course, you should make sure the crontab is working by verifying daily backups appear for your databases and other files.

If you want an example database backup script (You need to set your own IP and credentials), here is what I use:

databasebackup.sh

#!/bin/bash
echo 'Backing up WoW...'
echo 'Backing up Auth DB..'
mysqldump -h 127.0.0.1 -P3306 -uroot -ppassword acore_auth > acore_auth-$(date +%F).sql
echo 'Done'
echo 'Backing up Characters DB..'
mysqldump -h 127.0.0.1 -P3306 -uroot -ppassword acore_characters > acore_characters-$(date +%F).sql
echo 'Done'
echo 'Backing up World DB..'
mysqldump -h 127.0.0.1 -P3306 -uroot -ppassword acore_world > acore_world-$(date +%F).sql
chmod 600 acore*.sql
echo 'Cleaning up old backups..'
find /root/wowdbbackup -type f -iname '*.sql' -mtime +10 -delete
echo 'Done making all backups!'

This dumps the selected databases in to a file with the date tagged in the filename.
It also changes the file permissions to ensure all .sql files in that folder have been set with chmod 600
It looks for .sql files in the folder that are older than 10 days, and deletes them. MAKE SURE YOU READ THIS AND UNDERSTAND IT WILL DELETE ANY SQL FILES OLDER THAN 10 DAYS IN THE SPECIFIED FOLDER.

Hope this helps anyone else looking for a ‘simple’ backup solution for a Linux Server to a Synology NAS. The best thing is this can work with any Linux/Nix OS that has rsync! No need to worry about “will this work on my Linux?!”.

Are there better backup solutions or ways to do this? Probably…but this works for me – and hopefully it can work for you too!

Lastly – Shame on you Synology for the poor Linux support in Active Backup for Business.

EmulatorJS 4.x Added to Emulation Section

Hello Everyone – it’s been a while!

I’ve been working on emulation stuff for a bit and have added the EmulatorJS suite to the emulation section here:

https://thec0de.com/emulation/consoles/

I have a retro project using this core which is much better but I can’t release it to the public (at least not yet) because of 1) legality concerns and 2) security concerns.

The emulators available right now require you to provide your own roms. The retro system I have provides them…and as you can image this runs in to grey zones in legality. I don’t want any legal issues for bringing the classic retro passion to folks (which makes me $0 lol). The greatest concern is security though…The software was designed to be used locally, not over the internet.

Hopefully as time progresses – legality and security issues will be addressed. Until then – Enjoy!

ScummVM 2.7.0 Released

The beloved ScummVM has released an updated version 2.7.0

Here are the main updates:

New games:

  • Added support for Soldier Boyz.
  • Added support for C64 and ZX Spectrum versions of GLK Scott Adams Interactive Fiction games.
  • Added support for GLK Scott Adams adventures 1-12 in the TI99/4A format.
  • Added support for Obsidian.
  • Added support for Pink Panther: Passport to Peril.
  • Added support for Pink Panther: Hokus Pokus Pink.
  • Added support for Adibou 2 “Environment”, “Read/Count 4 & 5” and “Read/Count 6 & 7”.
  • Added support for Driller/Space Station Oblivion (DOS/EGA/CGA, Amiga, AtariST, ZX Spectrum and Amstrad CPC versions).
  • Added support for Halls of the Dead: Faery Tale Adventure II.
  • Added support for Chop Suey, Eastern Mind, and 16 other Director 3 and Director 4 titles.

New platforms:

  • Added support for the RetroMini RS90 under OpenDingux beta.
  • Added support for the 1st generation Miyoo (New BittBoy, Pocket Go and PowKiddy Q90-V90-Q20) under TriForceX MiyooCFW.
  • Added support for the Miyoo Mini.
  • Added support for KolibriOS.

General:

  • Reduced amount of false positives in Mass Add.
  • Updated the Roland MT-32 emulation code to Munt mt32emu 2.7.0.
  • Added support for shader-based scalers.
  • Added option for mono sound output (via –output-channels=CHANNELS command line option).
  • Improved cursor scaling in OpenGL mode.
  • Fix crash when browsing folders containing files with \1 in the names.
  • Added possibility to specify RNG seed via GUI or command line option.
  • Added possibility to run ScummVM in autodetection mode by renaming the executable starting with ‘scummvm-auto’ or by providing an empty file named ‘scummvm-autorun’ next to the ScummVM executable.
  • Added possibility to supply command line parameters which will be picked up automatically. Put them one per line in a file named ‘scummvm-autorun’.
  • Added possibility to customize the default settings by specifying an initial configuration file to load if no configuration file exists in the usual location (via –initial-cfg=FILE or -i command line option).
  • Added support for loading game resources which are bigger than 2GB on more platforms.

(You can view the full Changelog)

You can download the latest binaries from HERE

Added Boxer 4.1 Beta

I have updated the Boxer versions on boxer.thec0de.com to include both 2.0 and 4.1 Beta.

The reason for this update was to have a version that supports Apple Silicon CPUs. If you want to read more about it you can check the github repo here:

https://github.com/MaddTheSane/Boxer/releases/tag/AS-beta-4.1

There is a known bug worth mentioning:

Quitting Boxer after running DOS causes Boxer to crash.

I take no credit for this build – It is credited to MaddTheSane.

Ethereum Mining Profitable Again

Lots of people have been interested in my AMD RX580 BIOS mod:

Original (you should make your own…but just in case):
http://thec0de.com/115-D009PI2-101.ROM
Modded with 1750 over 2000 straps:
http://thec0de.com/115-D009PI2-101-MODDED.ROM

Now is a good time to be mining some Ethereum, and if you want to improve your performance, these BIOS mods may be what you are looking for! Check out CryptoCompare.com’s Calculator (modify to your specs of course):

https://www.cryptocompare.com/mining/calculator/eth?HashingPower=58&HashingUnit=MH%2Fs&PowerConsumption=400&CostPerkWh=0.16&MiningPoolFee=1

I am currently running them with 28+MH/s on Phoenix Miner on EthOS. Your mileage may vary:

GPU1: 65C 100% 125W, GPU2: 59C 100% 127W
GPUs power: 252.0 W
Eth speed: 56.351 MH/s, shares: 2356/0/0, time: 116:14
GPUs: 1: 28.264 MH/s (1171) 2: 28.087 MH/s (1185)

Get this card (Asus DUAL-RX580-8OG) on Amazon Here: https://amzn.to/3AAq1g0

Jellyfin HDHomeRun EPG Puller

If you are using Jellyfin on Linux, have a HDHomeRun cable tuner, AND have paid for the DVR feature – you may be wondering “Do I really have to pay for a separate EPG service in Jellyfin?!?!”

Answer is: NO – You can use the EPG data that you paid for with HDHomeRun

I have created a small script that will query HDHomeRun network cable tuner’s key, and use that key to download a EPG compatible with Kodi 🙂

You can make a file called pullhdhomerunxmltv.sh and put the following in it:

#!/bin/bash
echo 'Getting Current Key from HDHomeRun...'
KEY=$(curl http://192.168.10.2/discover.json | jq -r .DeviceAuth)
echo 'Current Key is' $KEY #optional line
echo 'Downloading TV Guide Data...'
curl --compressed https://api.hdhomerun.com/api/xmltv?DeviceAuth=$KEY > /data/Containers/jellyfin/xmltvlist.xml
echo 'Done!'

As you can see…This script is pretty simple. For most, no need for me to explain what it’s doing once you see it. However, to make it easy for everyone – I will explain a few things you must modify to make it suit your needs:

  1. Change 192.168.10.2 to the IP of YOUR HDHomeRun device.
  2. Change /data/Containers/jellyfin/xmltvlist.xml to save the epg file where YOU want it.
  3. Don’t forget to give execute permissions to the script:
chmod +x pullhdhomerunxmltv.sh

If this is not working – please make sure you have DVR service active on your HDHomeRun tuner. EPG is part of that service (gotta know when a show plays to automatically record it!).

Hope this helps some of you Jellyfin users out. I prefer watching TV with Kodi…but if you have to stream it to your phone or remotely – It comes in handy having it in Jellyfin too!

UPDATE: 2/25/2022 – The 2nd curl command appears to now require https:// being included. I’ve updated the code above. If you using it already, you’ll have to modify your script. If you are setting it up new for the first time – just copy and current script as it’s updated and should be good to go!

Introducing our new Boxer Fork Site (64-bit Support)

Happy New Year!!!

2021 – I decided to compile MaddTheSane’s Boxer fork on BigSur and make a site in honor of Boxer’s continued life!

https://boxer.thec0de.com

This build works on 10.15 (Catalina) and 11.0 (BigSur). It’s basically MaddTheSane’s with minimal personal tweaks. I take no credit for the work here … I just appreciate his, the original author’s work, and the DOSBox team for making retro gaming possible in 2021’s modern 64-bit operating systems.

Minimal testing on this – If you have any problems you can post them on MaddTheSane’s Github. Hope you enjoy it folks!

Edit – Had some distribution issues with signing of app. I have a copy I found here instead which works until then.

1 2 3 4